A greenhouse foundation is one of the most important parts of your greenhouse project. No matter where the foundation lies, it must be level and square. All of our greenhouses will have the “outside” dimensions listed. These dimensions are what the foundation must be built to, to ensure proper fitting of the walls. It is essential that you cross-measure the foundation from far corner to far corner (fig. 2). The measurement should be exactly identical each way.
If you live in a climate that has freezing temperatures, you will want to build your greenhouse below the frost line. In northern climates that could be down a few feet, whereas warmer climates will only be down a few inches. If you are uncertain of the frost line in your area, contact your local Building Permit Agency. They will be able to provide you with this information. It is important that in areas where the ground freezes, that your foundation reach below the frost line to prevent damage from the ground heaving.
An excellent way of insulating and protecting your foundation is to line the outside of the foundation with 1” foam insulation, 1 to 2 ft deep or to your frost line. This will reduce heat loss through the soil and will help to reduce your heating cost. If you have an existing foundation, use a spade to pull enough soil away to slip the foam board up next to the foundation. Tamp the soil firmly back against the board.
- A level and square foundation is critical for a successful greenhouse installation.
- Be sure to double-check dimensions for your greenhouse.
- Remove plants and sod, and then level the site.
- Square the foundation or forms by measuring diagonally from opposite corners and shifting the frame/forms until the measurements are equal (fig. 2).
- Level foundation using a contractor’s level (fig. 3).
- Charley’s Cross Country greenhouses with a truss (14 ft or longer depending on width) require a 5-1/2” wide foundation.
- 16 ft wide Cross Country’s and some Cross Country’s with wind or snow load upgrades require an 8” wide foundation.
- Check your local building code before deciding on your foundation.
Some materials used for wood foundations and sill plates
Pressure treated lumber w/ high amounts of Copper
There are various levels of protections – check the end tags to determine what grade wood you have. In general, the dimensions of the lumber will determine the different grades. The grades are:
- Above ground use
- Ground contact – can be set on the ground
- Permanent Wood Foundations – Can be buried
- Salt Water
The new treated lumber will corrode common steel, aluminum, and low-grade galvanized hardware. If this lumber will be in contact with the aluminum frame of the greenhouse, a permanent barrier between the wood and the frame of 10 mil or thicker will be needed.
Must use stainless steel or G-185 galvanized hardware.
Redwood, Eastern red cedar (juniper), Western red cedar, black locust, and bald cypress
Domestic wood species that are naturally more decay-resistant than others. The durability can vary among different wood species and between trees of the same species or within one tree itself. This can cause a wide range of life expectancy.
Plastic Materials for Sill Plates
100% plastic therefore needs no maintenance or sealing. Like wood products, it can be sanded and fastened using traditional tools and methods. Plastic lumber is commonly available in three grades, Structural Solid, Solid, and Hollow. Structural Solid plastic lumber has a 20% fill of fiberglass to provide superior strength and reduce the expansion and contraction properties. It can be used for sill plates. Hollow and Solid are not to be used as structural members as they have less rigidity than wood lumber.
Wood Composite Materials for Sill Plates
Wood composite material is made from recycled plastic and waste wood fiber, like sawdust. It never needs to be retreated and has no maintenance or sealing. Like wood products, it can be sanded and fastened using traditional tools and methods. Wood composite material has a low thermal expansion and contraction. It is not designed to perform as a structural replacement for wood or for primary structural load-bearing elements, such as posts, joints, and beams. It can be used as a sill plate with concrete, or as the top layer over pressure-treated lumber in a wood foundation.
Untreated Pine, Fir or Hemlock
Untreated lumber will decay or rot, especially when the wood is placed in contact with the soil. A sealant that includes pest controls must be used and reapplied every year.
Pressure treated lumber w/ Arsenic
The old style pressure-treated lumber. It can leach arsenic. All sizes are treated for permanent wood foundations.
No longer available to the homeowner.
Pressure treated lumber w/ Boron
Water soluble even when dry
For indoor use only
Greenhouse Foundations
The four commons types are: Wood, beam and pier, concrete wall (knee wall), and concrete slab. (For smaller glass greenhouse (8’ x 12’) and greenhouses with plastic glazing up to 12’ x 16’, a wood foundation is popular due to ease of installation and low cost. However, if you live in an area with hard winter freezes, a concrete foundation or beam and pier (timber on concrete columns) may be your best bet. If you would like extra headroom and space for hanging plants, another option is to build your greenhouse on top of a knee or stem wall. We recommend using Cedar, Redwood or plastic/wood composites for the foundation and sill plates in the greenhouse. Once you have taken all factors into account for your foundation, you will be ready to begin your greenhouse project..
The diagrams should give you a good idea of how each foundation type could be built. Be sure to check your local building code requirements. There are many books on the market that give specific information for building foundations.
Wood or Beam and Pier Foundation (fig. 1)
Dig down to solid ground. Level the site using a contractor’s level. Lay down a 2-3” layer of crushed gravel. Fasten a double layer of 2×4’s
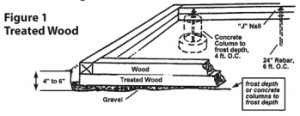
together using 2-1/2” deck screws; making sure the foundation remains square and level. (Greenhouses over 10 ft. x 12 ft. should have a double layer of 4×4’s.)
If you have not poured concrete columns to frost depth with anchor bolts, pound 24” rebar into the ground on the inside of the 2×4’s. The
columns or rebar should be 1 ft. from each corner and spaced 4 ft. on center (O.C.) along the 2×4’s.
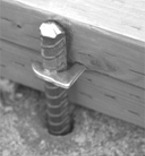
Attach the top of the rebar to the 2×4’s with conduit “J” nails (fig. 5). For windy sites, use anchor stakes (#1405) to hold the 2×4’s in place. Use 1” wood screws to attach the greenhouse to the 2×4’s.
Concrete Wall or Concrete Slab Foundation (fig. 6 & fig. 7)
Cover the pour area with 2” of gravel. For a slab, use rebar and wire mesh to strengthen the floor. Place 1/2” x 9” anchor bolts into the fresh concrete, leaving only 1-1/2” above the concrete surface. (Thinner composite materials may have a different amount of exposure above the concrete surface.) Set bolts within 1 ft. of each corner, then space additional anchor bolts about 4 ft. apart.

On top of the concrete foundation use a Cedar, Redwood, treated wood (with barrier), or composite sill to which your greenhouse will be
anchored. Countersink nuts into the wood sill so that the greenhouse base will not rest on the nuts.
Greenhouse Floor
Drainage is important to having a successful greenhouse. There are several types of floor material that you can use to achieve proper drainage. Materials such as gravel, bricks and pavers will provide proper drainage and easy installation. Before laying down any floor material, it is important to install the weed barrier (#B2379) to reduce weeds. Plastic liners are not generally recommended. As a last resort, it can be used, but holes must be made to ensure you will have proper drainage.
A permanent flooring such as concrete or mortared pavers may be more difficult to install but can be easier to clean, more sturdy, and will block out weeds on its own. Landscaping bar is not recommended because it can harbor insects and diseases.
Bricks and pavers are an excellent choice for pathways or the entire greenhouse flooring. They can be more expensive to install; however, concrete based pavers can be a more economical solution. They are easy to install and are available in many different styles. This is where you are able to customize the interior of your greenhouse to suit your style. As with the permanent materials, they store heat and are easy to clean.
How to lay bricks or pavers
First lay down 2” of fine crushed rock (5/8 or less). Build a frame of 4×4 treated lumber. The width and length of the walkway is determined by laying out the pattern of bricks or pavers with approximate 3/8” spacing. Spread 1” of sand inside the frame and set pavers in place. Fill the 3/8” spacing with sand. A final touch is to plant lemon thyme between the bricks. Finish the remainder of the floor with 2” of loose material.
Permanent Flooring
Permanent flooring includes either a concrete slab or mortared pavers. Although they are more time consuming and expensive to install, they are easy to clean, and will hold heat. They provide a sturdy surface for benches and there is no need for weed barriers. They must have a rough surface, so it will not be slippery when wet. You can add terra-cotta dye into the concrete when you pour the floor if you would like a different look. When considering a concrete slab, you must plan for drainage before you pour the slab. The floor must either drain into a central drain with a sump underneath, or taper down at the edges slightly. Cover the pour area with 2” of gravel. For a slab, use rebar and wire mesh to strengthen the floor. On top of the concrete foundation use a treated 2×4 wood sill to which your greenhouse will be anchored. Place 1/2” x 9″ anchor bolts into the fresh concrete, leaving only 1-1/2” above the concrete surface. Counter-sink nuts into wood sill so that greenhouse base will not rest on the nuts. Set bolts within 1 ft. of each corner, and then space additional anchor bolts about 4 ft. apart.
Loose Material
One of the most popular materials to use for flooring under the benches is pea-sized gravel. It is easy to install, inexpensive and long lasting. An added summer benefit is that it can be sprayed down with water in the morning, and as the water evaporates, it cools the greenhouse and adds humidity to the environment. Since it drains well, there is less chance of standing water, which can cause diseases. Since it can be more difficult to stand on, using a hard flooring down the aisle is more practical.
There are several other options. Lava Rock has the same benefits as gravel, is beautiful and stores solar heat. This can be a wonderful addition for a decorative Southwestern theme. White landscape rock is another choice for loose material. As with the gravel and lava rock, the landscaping rock has excellent drainage, helps to raise humidity, and is easy to install. The best feature of white landscape rock is that it will reflect light. (Anything white in the greenhouse will bounce back incoming light. This can be a great benefit in the winter, when every bit of light this is available is desired.)
For high quality garden supplies, visit our Garden Supply Shop today!
Reach out to our team for more information at Charley’s Greenhouse & Garden.