How to Build a Heated Propagation Bed for Seeds and Cuttings: A Step-by-Step DIY Guide
Jump-start your growing season with a DIY heated propagation bed—a reliable and energy-efficient way to start seeds and root cuttings indoors or in a greenhouse. With just a few materials and some basic tools, you can create a customized hot bed that keeps soil temperatures consistent and encourages strong root development.
Follow this step-by-step guide to build your own 2 ft. x 3 ft. heated propagation bed using a soil warming cable.
✅ Benefits of a Heated Propagation Bed
-
Speeds up germination
-
Promotes stronger root growth
-
Ideal for early-season planting
-
Extends your growing season in cool climates
🔧 Materials Needed for a 2 ft. x 3 ft. Heated Propagation Bed
-
1 piece of 1/2″ exterior-grade plywood, cut to 24″ x 36″
-
Two 2×2 boards at 36″ long
-
Two 2×2 boards at 21″ long
-
Two 1×4 boards at 37-1/2″ long (for long sides)
-
Two 1×4 boards at 24″ long (for short ends)
-
1 cubic foot of coarse sand or sandy soil
-
1 soil heating cable (e.g., Economy Soil Heating Cable)
-
Wood screws, drill, and measuring tape
🛠 Step-by-Step Instructions
1. Build the Base
Start by cutting a piece of 1/2″ exterior plywood to your desired size—24″ x 36″ works well for small-scale propagation. This will serve as the bottom of your heated seed bed.
2. Construct the Frame
Attach the 2×2 boards along the bottom edge of the plywood using screws to create a sturdy base. Use the 36″ pieces for the long sides and the 21″ pieces for the short sides. This creates a slight recess for insulation or added stability.
3. Add Side Walls
Secure the 1×4 boards around the perimeter of the plywood base to create a shallow box. Fasten the 37-1/2″ boards to the long edges and the 24″ boards to the short edges. This box will contain the sand and warming cable.
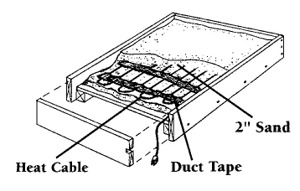
4. Install the Soil Warming Cable
Pour a 1-1/2″ base layer of dry sand or sandy soil into the frame. Carefully lay the soil warming cable in gentle loops following the manufacturer’s instructions. Important: Cables should never touch or overlap when energized, as this may cause overheating.
Once the cable is in place, cover it with an additional 1/2″ to 1″ layer of sand. This insulates the cable and helps distribute heat evenly across the surface.
5. Finish and Use
Plug in the heating cable and monitor the temperature using a soil thermometer. Ideal temperatures for seed germination range from 70°F to 85°F, depending on the plant variety. Always unplug the cable when not in use to ensure safety and prolong the life of your setup.
💡 Pro Tips
-
Use a thermostat controller to regulate soil temperature automatically.
-
Place seed trays or propagation flats directly on the sand.
-
For extra efficiency, build a hinged lid or cover with plastic sheeting to retain heat and humidity.
🌱 Great for:
-
Gardeners looking to start seeds indoors
-
Propagating cuttings of herbs, vegetables, or ornamentals
-
Anyone wanting a cost-effective heated seed bed without buying commercial models
By building your own DIY heated propagation bed, you can gain more control over your plant propagation and extend your growing season with minimal investment.
Visit our Garden Supply Shop for high quality garden supplies and greenhouse equipment.